Using Get-AzureRmResource to find Azure resources using Tags

This post will look at how we can find resources in Azure using the latest PowerShell modules and replace the Find-AzureRmResource cmdlet which will no longer work.   Note that the commands are not similar and official documentation is limited or not very clear.  https://docs.microsoft.com/en-us/azure/azure-resource-manager/resource-group-using-tags

The term ‘Find-AzureRmResource’ is not recognized as the name of a cmdlet

The above error will be returned if you try and use the old cmdlet after you have upgraded to V6.0+ of the Azure PowerShell modules.  Remember to also update your Azure Automation modules if you are using this.

So how do we find resources by their tag name AND value using Get-AzureRmResource ?

Well the short answer is first get the resources with the tag NAME you are interested in, and then check the value of that specific tag.

# Brings back all objects with specified tag name, then checks value of specific tag
Get-AzureRmResource -TagName "Autoshutdown" -ResourceType Microsoft.Compute/virtualMachines `
    | where { $_.Tags[‘Autoshutdown’] -ieq "No" } | Select Name, tags

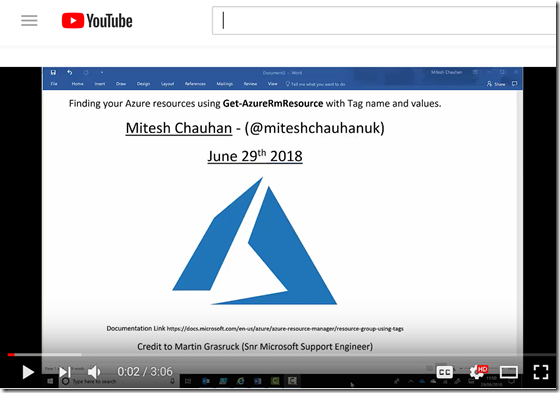
Video Demonstration with Examples

image

https://youtu.be/lZJ5V9pgHOM

Troubleshooting

You receive the error The term ‘Find-AzureRmResource’ is not recognized as the name of a cmdlet when you run your script manually or as part of an Azure Automation job.

This means the Azure PowerShell modules have been updated to the latest V6 or higher.  You need to change your code to use Get-AzureRmResource to find your objects.

Five Tips to Help Save Money on Your Azure IaaS Spend

This article looks at ways Microsoft Azure customers can significantly reduce their Azure spend as well as how to keep a track of expenditure.  I have worked with a number of customers to help them save anything between 25-60% of their Azure spend by implementing some of the strategies outlined here.  This article has been written for a business focused audience and is aimed at those who are involved in managing the operational expenditure of their Azure subscriptions.

If we think about costly resources in Azure IaaS many people focus on things like storage and traffic which traditionally would have been costly in on-premises data centres.  These items in Azure typically do not amount to much on the monthly bill in the grand scheme of things.   The main contributors to high costs are misconfigured or mismanaged virtual servers and in the worst cases, servers that are not even being used !  The main areas of concern I see are environments that have no controls or governance in place, with little or no regard to managing costs.   It is very important to audit Azure infrastructure environments to see how implementing some controls can help organisations use the platform more efficiently.


1. Virtual Machine (VM) Types and Scaling

Select virtual machine sizes based on expected resource requirements, that are suitable for the role they play and do not over-spec them.  Many standard workloads work well with Standard A series VMs so choose D and above for workloads that really require that extra CPU power and memory capacity.


Scale the VMs up or down in size depending on expected usage patterns.  For example, scale down larger VMs in the evenings and weekends when expected usage is lower than that of normal business hours.  This can be done on a schedule or even by monitoring the CPU load on the VMs.  Note that in order to do this the VM would be restarted.    You can also scale out a set of VMs to increase load capacity in the case of a web server farm for example when there are peaks of activity on the farm, and then scale back down during quiet times. 


2. Azure Automation to Manage Costs

As mentioned above in the Virtual Machine section it is possible to resize virtual machines according to schedules.  One of the methods to do this is to use automation scripts.   One automation policy I have found to be most effective is to set all non production VMs to shutdown nightly and NOT to start up in the daytime unless required.  If automated start-up is required it is possible, but these cases are usually set for a short period during testing or development cycles, and is not usually an ongoing requirement.  Use custom role-based access to grant developers just enough rights to see their development and test servers as well as manage their power settings but do not allow for any infrastructure level modifications.

3. VM Storage Optimisation

There are several storage types that can be allocated for Virtual Hard Drives(VHDs) for VMs.   These are locally redundant storage (LRS) and geo-redundant storage (GRS) which are both standard disk types.  There are also tiered SSD storage level options called “premium” storage for customers that require higher performance storage.

Generally speaking, LRS is ok for most workloads and provides resilient storage within an Azure data centre.  Many customers choose GRS storage to protect against site outages.   GRS replicates the VHD data across Azure data centres to ensure a copy of the data is available if the primary data centre has an outage.  Geo-redundant storage is approximately double the price of LRS storage.   Depending on the workload it may be better to have offsite regular backups of the VM disks using the Azure backup service or a backup server such as “Microsoft Azure Backup Server” or even System Centre DPM.    For SQL Server VMs, for example, it is recommended not to use GRS storage, as data is copied across datacentres asynchronously and the order of the data being synchronised is not guaranteed.  For SQL it is better to backup at the database level to a GRS account as well as having VM backups as required.   For most servers including, but not limited to domain controllers, it is not usually necessary for premium storage.  Use premium storage accounts for servers that require higher IOPs than standard disks afford.  Also, consider striping of standard disks to increase disk IOPS as 4 x 500 IOPs standard drives would provide you with a logical drive with 2000 IOPs for example.

Be careful when setting up VMs in the GUI as it can default to using SSD disks instead of standard (labeled HDD) disks.  I have seen customers make this mistake / fall into that trap!


4. Application Licensing and MSDN Subscriptions

image

Select the correct licensing model for your applications such as SQL Server or even 3rd party appliances for example.   There are many 3rd party images in the market place which you can buy a license for or you can pay as you use.   Consider the lifetime of the product usage as well as the uptime required and compare the bring your own license (BYOL) cost model of that product compared to pay as you go (PAYG) options. For SQL Server, for example, check the feature set required, do you need Standard or Enterprise? Do you already have licenses with Software Assurance you can bring with you (BYOL)?  Or do you need to use the gallery images which have the license costs built in?  With Enterprise versions of SQL check the amount of cores you need.  Do you need 4,8 or more cores ? Licensing will double when you go from 4 to 8 cores for SQL Server Enterprise.  For development environments where you are entitled to use Developer Edition, use a Windows 2012 Server and install SQL Developer Edition.  Where this is not possible for test / dev environments consider a trial license which lasts for 180 days, as this time frame may be sufficient for the requirement.

If users have MSDN subscriptions they can have their own personal MSDN instance (Azure subscription) which includes free credits and reduced hosting costs.   An organisation can also set up a special Development Subscription within their Azure Enterprise Agreement for developers who have an MSDN license.   This type of subscription offers reduced costs (no OS licensing costs for example) as well as more VM template options such as Windows 10 for test and dev workloads.

You may also set up a completely free trial to try out the platform. Click on the image above to set up a free trial or visit https://azure.microsoft.com/free/


5. Billing Reports

image

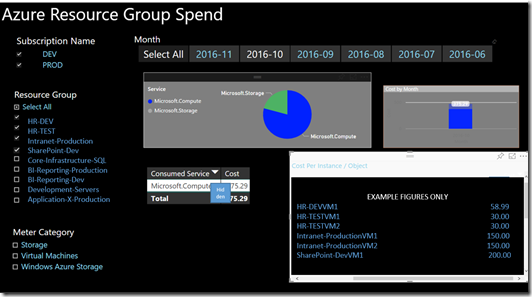
To be able to report on billing easily you can split your Azure resources firstly into subscriptions for clear billing boundaries.  This is a good option to separate production from non-production workloads for example.  Then split resources further into Resource Groups which are logical groups of your Azure assets.  For example, you could group all Azure assets that relate to the HR Development system into a resource group name HR-Dev as shown in the example below.

Use PowerBI to build a report that provides a good high-level view of your subscriptions and resources and allows drill down to specific assets.  You can also filter on months, subscriptions and resource groups for example, as well as object types providing you with greater insight into Azure usage and spend.

To add further information to your objects use Tagging.   These can then be picked up by 3rd party reporting tools and services or you can roll your own feeds into PowerBI after some manipulation of the raw CSV billing files provided by Azure from your EA Portal.


I hope you found this article interesting and helpful and more importantly, I hope it can provide some assistance in helping to understand and manage your Azure spend.  

Please drop a note below if you found it helpful or if you have any questions or other good ideas on this subject you would like to share.  


Thank you for stopping by.


Automation Runbook To Shutdown Azure Resource Manager (ARM) VM

Here I will be sharing an automation runbook which you can parameterise to shut down VMs within a subscription based on a resource group using tags.   This article will not be a how to guide but a reference point for this script. 

You may add a parameter for the resource groups or you could even use a loops to run through all the resource groups by modifying this code.

If for example you have tags on your VMs such as Autoshutdown : YES then the runbook will pick these VMs to shut down.

Automation Runbook to Stop Azure VMs by Tag

<#

    .SYNOPSIS

        Stops all the Azure VMs in a specific Azure Resource Group if autoshutdown tag is set to Yes


    .DESCRIPTION

        This sample runbooks stops all of the virtual machines in the specified Azure Resource Group.

        For more information about how this runbook authenticates to your Azure subscription, see the

        Microsoft documentation here: http://aka.ms/fxu3mn.


    .PARAMETER ResourceGroupName

        Name of the Azure Resource Group containing the VMs to be stopped.

        Shutdown value – Can be set to YES by default or use a time zone for example CET and pass this in as a param and run at required time.  Useful when the group of Vms have different time zone requirements.


    .REQUIREMENTS

        This runbook will only return VMs deployed using the new Azure IaaS features available in the Azure Preview Portal and Azure Resource Manager templates. For more information, see

        http://azure.microsoft.com/en-us/documentation/videos/build-2015-introduction-and-what-s-new-in-azure-iaas/.


    .NOTES

        AUTHOR: Mitesh Chauhan 02/08/2016

        LASTEDIT: 17/1/2016

#>


workflow shutdown-dev-vms

{

       param(

             [Parameter(Mandatory=$true)]

        [String] $ResourceGroupName  = “RG NAME”,


       #The name of the Automation Credential Asset this runbook will use to authenticate to Azure.

        [Parameter(Mandatory=$true)]

        [String] $CredentialAssetName  = “Azure Automation Cred”,


        [Parameter(Mandatory=$true)]

        [String] $SubscriptionID  = “Sub ID”,


        [Parameter(Mandatory=$true)]

        [String] $Shutdownvalue  = “Yes”

         )


    #Get the credential with the above name from the Automation Asset store

    $Cred = Get-AutomationPSCredential -Name $CredentialAssetName

    if(!$Cred) {

        Throw “Could not find an Automation Credential Asset named ‘${CredentialAssetName}‘. Make sure you have created one in this Automation Account.”

                }


Login-AzureRmAccount -Credential $Cred

Select-AzureRmSubscription -Subscriptionid $SubscriptionID


# To get all VMs in a subscription use the following line.

# Also change stop line to Stop-AzureRmVM -ResourceGroupName $vm.ResourceGroupName

# $vmList = Find-AzureRmResource -TagName Autoshutdown -TagValue $Shutdownvalue | Where-Object {$_.ResourceType -eq “Microsoft.Compute/virtualMachines”} | Select Name, ResourceGroupName


# Gather all VMs with auto shutdown tag set to the tag value in the parameters

$vmList = Find-AzureRmResource -TagName Autoshutdown -TagValue $Shutdownvalue | Where-Object {$_.ResourceGroupName -eq $ResourceGroupName -and $_.ResourceType -eq “Microsoft.Compute/virtualMachines”} | Select Name, ResourceGroupName


foreach ($VM in $vmlist)

            {

                $PowerState = (Get-AzureRmVM -ResourceGroupName $ResourceGroupName -Name $VM.Name -Status -ErrorAction $ErrorActionPreference -WarningAction $WarningPreference).Statuses.Code[1]


                if ($PowerState -eq ‘PowerState/deallocated’)

                   {

                    $VM.Name + ” is already shut down.”

                   }

                else

                  {

                    $VM.Name + ” is being shut down.”

                    $ShutdownState = (Stop-AzureRmVM -ResourceGroupName $ResourceGroupName -Name $VM.Name -Force -ErrorAction $ErrorActionPreference -WarningAction $WarningPreference).IsSuccessStatusCode

                    start-sleep -Seconds 10                             

                              if ($ShutdownState -eq ‘True’)

                      {

                    $VM.Name + ” Has been shut down successfully.”

                       }

                    else

                       {

                    $VM.Name + ” Has failed to shut down. Shutdown Status  = “ + $ShutdownState

                       }

                  }

             }

Write-output “Script complete”

}


Thank You For Visiting.

How to Download IaaS V2 Azure Gateway VPN Diagnostics (Azure Resource Manager (ARM) Network).

So how do we get VPN / Gateway diagnostics out of Azure these days if we are using an ARM based virtual network ?  Well we need to run a script in Azure PowerShell (v1.0 or later) to collect diagnostics.  

How do I Get Gateway VPN Diagnostics for an Azure ARM VNET ?

I have put this together as it took me a while to find it and get my script working so I have modified it and made it simpler for me at least to use in the future as part of my toolkit so feel free to do the same.

In this article I will show how you can pull out diagnostic data from the Azure platform for an ARM based virtual network gateway which could be useful for troubleshooting VPN issues.

The script uses the original post by Keith Mayer but I have added another check to it and some variables at the top which may make it a bit easier to use.

Why Do We Need Azure VPN Gateway Diagnostics ?

Well if you are having trouble setting up your VPN device and you wish to check what’s going on at the Microsoft side then this will come in very handy.  If you are planning to raise a support call with Microsoft then they may well ask for this so it would be in your interest to set this up first and provide this as part of your support ticket to help speed things up.

What Can Possibly Go wrong ?

In most cases the problem is at the customer VPN side as there is very little or nothing we can specify on the Microsoft side in terms of the actual VPN settings.  Here is some further reading on the limited gateway options we have.  https://azure.microsoft.com/en-gb/documentation/articles/vpn-gateway-about-vpngateways/.

Her e are some of the gateway properties we can specify the following items :-

      • Dynamic Gateway IP (Given by Azure!)
      • Pre Shared Key
      • Gateway Type – Routebased or Policybased
      • VPN Type – VPN or ExpressRoute
      • Gateway SKU – Basic, Standard or High Performance

As you can see we have no control over IKE settings, timeouts, encryption levels etc.  However the customer may have any type of supported (or not) device such as a CISCO ASA, ASR, Juniper, Checkpoint etc.  Each one of these have their own GUI’s and settings for VPN connections which can be difficult to get just right and this is another reason why gathering as much info as possible from the Azure side may help.  Full compatible device details are provided here :- https://azure.microsoft.com/en-gb/documentation/articles/vpn-gateway-about-vpn-devices/.  Some have links to setup instructions and samples.  This link also provides specific settings such as IKE and IPSEC.   This is the info that is provided by Microsoft to help get your VPN device up and running.  If all is looking ok on the Microsoft side then the customer may need to contact their VPN device vendor if they are not able to establish a connection.

Here is the script

The first step is to connect to your subscription in both Resource Manager (RM) AND Service Manager (SM).  It also requires you have Azure PowerShell module version 1.0 or above.   The reason for using both Azure models (SM and RM) is that the VPN diagnostics are only available on the older SM platform.

# This script downloads gateway diagnostic data for a VPN Gateway inside an Azure Virtual Network

# Original Script provided by Keith Mayer of Microsoft

# http://blogs.technet.com/b/keithmayer/archive/2015/12/07/step-by-step-capturing-azure-resource-manager-arm-vnet-gateway-diagnostic-logs.aspx

# Modified by Mitesh Chauhan (miteshc.wordpress.com) slightly to add some variables and only get provisioned state gateway.


# STEP 1 – SIGN IN TO BOTH Azure SM and RM

$SubscriptionID = “Your Sub ID”

$cred = Get-Credential

# Sign-in to Azure via Azure Resource Manager and also Sign into Azure Service Manager

# Set up Azure Resource Manager Connection

Login-AzureRmAccount -Credential $cred

Select-AzureRmSubscription -SubscriptionId $subscriptionId


# Set up Service Manager Connection – Required as gateway diagnostics are still running on Service Manager and not ARM as yet.

Add-AzureAccount -Credential $cred

Select-AzureSubscription -SubscriptionId $subscriptionId


# VNET Resource Group and Name

$rgName = ‘RG NAME’

$vnetGwName = “Gateway Name”

$timestamp = get-date -uFormat “%d%m%y@%H%M%S”


# Details of existing Storage Account that will be used to collect the logs

$storageAccountName = “Storage account”

$storageAccountKey = ‘KEY HERE’

$captureDuration = 60

$storageContainer = “vpnlogs”

$logDownloadPath = “C:\Temp”

$Logfilename = “VPNDiagLog_” + $vnetGwName + “_” + $timestamp + “.txt”


# Set Storage Context and VNET Gateway ID

$storageContext = New-AzureStorageContext -StorageAccountName $storageAccountName -StorageAccountKey $storageAccountKey


# NOTE: This is an Azure Service Manager cmdlet and so no AzureRM on this one.  AzureRM will not work as we don’t get the gatewayID with it.

$vnetGws = Get-AzureVirtualNetworkGateway


# Show Details of Gateway

$vnetGws


# Added check for only provisioned gateways as older deleted gateways of same name can also appear in results and capture will fail

$vnetGwId = ($vnetGws | ? GatewayName -eq $vnetGwName | ? state -EQ “provisioned”).GatewayID


# Start Azure VNET Gateway logging

Start-AzureVirtualNetworkGatewayDiagnostics  `

    -GatewayId $vnetGwId `

    -CaptureDurationInSeconds $captureDuration `

    -StorageContext $storageContext `

    -ContainerName $storageContainer


# Optional – Test VNET gateway connection to another server across the tunnel

# Only use this if you are connected to the local network you are connecting to FROM Azure. Otherwise create some traffic across the link from on prem.

# Test-NetConnection -ComputerName 10.0.0.4 -CommonTCPPort RDP


# Wait for diagnostics capturing to complete

Sleep -Seconds $captureDuration


# Step 6 – Download VNET gateway diagnostics log

$logUrl = ( Get-AzureVirtualNetworkGatewayDiagnostics -GatewayId $vnetGwId).DiagnosticsUrl

$logContent = (Invoke-WebRequest -Uri $logUrl).RawContent

$logContent | Out-File -FilePath $logDownloadPath\$Logfilename


I hope you found this information and script useful.


Thank you for visiting !
Installing Microsoft Anti Virus Extension to Azure Resource Manager VM using Set-AzureRmVMExtension

Hi  ! In this article I will show how to install the MS AV extension into an Azure Resource Manager (ARM) based Virtual Machine using PowerShell.  This is because the feature to add it in the portal is not yet available for ARM VMs.  Using a script and a config file also gives us the option to customise the application configuration.

Why Install the Microsoft Anti Virus Extension ?

This extension has been made available from Microsoft for free to protect your virtual machines running in Azure, so there is one good reason to start  with !  As it is a free tool  there is no central management server or console. However with the use of Operations Management Suite (OMS) which also has a free tier you can quickly get a view on all your Azure VM infrastructure and see VM protection status including whether they are up to date or not.

The tool itself is a version of the enterprise class Microsoft System Center suite of products and so it is not just a basic tool and I have known it to behave and work very well.  It also has some good configuration options for a free tool such as specifying exclusion file types and paths, schedules and real-time protection.  I may do another article on the integration with OMS and the business value of the tool in the near future..  For now I will get on with the implementation as there is little documentation out there currently (Feb 2016).

Configuration Options for MSAV Extension

As mentioned above the client can be installed with some configurations options.  The default scripts available just switch it on with default settings and real-time protection.    I have provided a method where you can point to a customised JSON file to configure your settings as required and apply these.   Such as specific exclusions and file paths etc.

For a rundown on the configuration options and a good overview of the product, head here:-

https://azure.microsoft.com/en-us/documentation/articles/azure-security-antimalware/

Requirements

The VM must be a Resource Manager type VM and be associated to a Resource Group.  Your Azure PowerShell module needs to be version 1.0 or above.  Note the RM on the xxx-AzureRm cmdlets.  The VM also needs to be a Windows Server.


Microsoft Azure VM Anti Malware Agent Install Script


# Install Microsoft AntiMalware client on an ARM based Azure VM

# Check note at the end to be able to open up the SCEP antimalware console on the server if there are problems.

# Author – Mitesh Chauhan – miteshc.wordpress.com

# For Powershell 1.0.1 and above


# Log in with credentials for subscription

Login-AzureRmAccount


# Select your subscription if required (or default will be used)

Select-AzureRmSubscription -SubscriptionId “Your Sub ID here”


$resourceGroupName= “RG NAME”

$location= “North Europe”

$vmName= “VM NAME”


# Use this (-SettingString ) for simple setup

$SettingsString = ‘{ “AntimalwareEnabled”: true,”RealtimeProtectionEnabled”: true}’;


# Use this (-SettingString ) to configure from json file

$MSAVConfigfile = Get-Content ‘C:\Scripts\MSavConfig.json’ -Raw


$allVersions= (Get-AzureRmVMExtensionImage -Location $location -PublisherName “Microsoft.Azure.Security” -Type “IaaSAntimalware”).Version

$typeHandlerVer = $allVersions[($allVersions.count)1]

$typeHandlerVerMjandMn = $typeHandlerVer.split(“.”)

$typeHandlerVerMjandMn = $typeHandlerVerMjandMn[0] + “.” + $typeHandlerVerMjandMn[1]

$SettingsString = ‘{ “AntimalwareEnabled”: true}’;


# Specify for -SettingString parameter here which option you want, simple $settingsstring or $MSAVConfigfile to sue json file.

Set-AzureRmVMExtension -ResourceGroupName $resourceGroupName -VMName $vmName -Name “IaaSAntimalware” -Publisher “Microsoft.Azure.Security” -ExtensionType “IaaSAntimalware” -TypeHandlerVersion $typeHandlerVerMjandMn -SettingString $SettingsString -Location $location


# To remove the ANti malware extension

# Remove-AzureRmVMExtension -ResourceGroupName $resourceGroupName -VMName $vmName -Name “IaaSAntimalware”


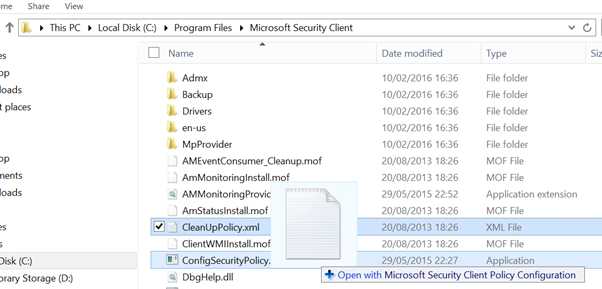
# If you have error saying Admin has restricted this app, Navigate to “C:\Program Files\Microsoft Security Client”

# Run “C:\Program Files\Microsoft Security Client\ConfigSecurityPolicy.exe cleanuppolicy.xml”

# Or simply drag the cleanuppolicy.xml file above onto the ConfigSecurityPolicy.exe to sort it and you should be in.


MSAV Config JSON File

Copy the text below into a file and name it MSavConfig.json for example.  the script above used c:\Scripts folder.

{

“AntimalwareEnabled”: true, 

RealtimeProtectionEnabled“: true, 

ScheduledScanSettings“: {        

       “isEnabled”: true, 

       “day”: 1, 

       “time”: 120, 

       “scanType”: “Quick”  

       },        

       Exclusions“: {

             “Extensions”: “.mdf;.ldf”,

             Paths“: “D:\\;E:\\”,

             “Processes”: “excludedproc1.exe;excludedproc2.exe”    

             }

       }


Unsupported Workaround for those who try and open the console

If you try and open the console you can see and change the settings but by default Microsoft have disabled the use of the UI as it should only be managed through the extension (scripting).  The following steps are provided to be able to see the console for testing / dev only.  The solution to do this may not be a supported configuration.

Check Install and fix “Administrator has Restricted access to this app” Message

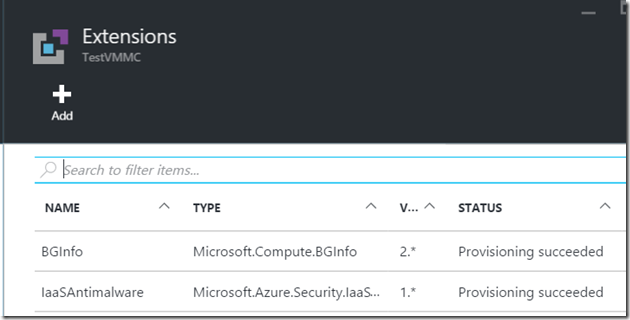
Once the agent is installed you will see it identified in the extensions section in the Azure portal.

image

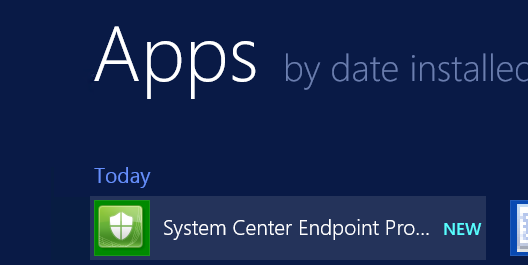
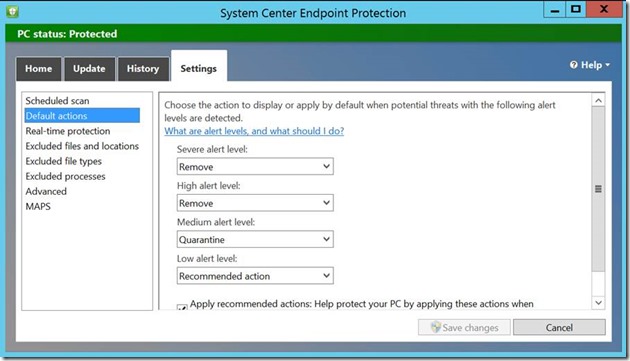
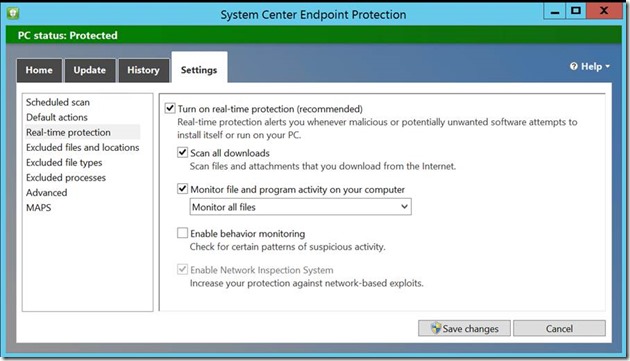
log into the machine and search for the System Center Endpoint Protection Tool.

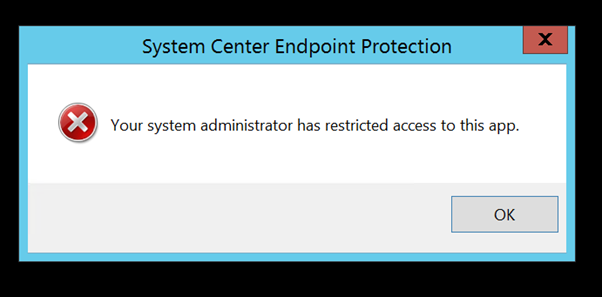
You may (and probably will) get this error saying “Your system administrator has restricted access to this app.”

Simply navigate to the “c:\programfiles\Microsoft Security client” folder drag the cleanup.xml file to the configureSecurityPolicy.exe file.

The next time you click on the application the console will open. Remember this may not a supported “fix”.

image

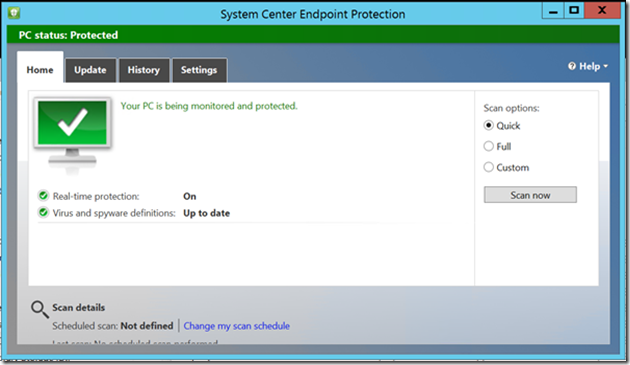
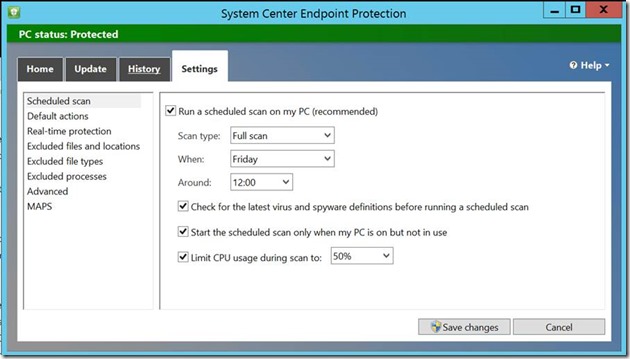
Here are some further screen shots to show setting.

clip_image002

clip_image004

clip_image006


Thanks for visiting and I hope you found this useful !


Mitesh

Does your Azure IaaS Infrastructure Need an Update ?

In this article I will go through some of the scenarios and limitaions organisations face who started their Azure Infrastructure as a Service ( IaaS) journey in the early stages of its release (Early – Mid 2013).    I will also note a high level update process and also some of the limitations in the current Azure IaaS platform.

This article does not go into exact steps but covers a higher level executive view of the scenarios and processes discussed.   The focus is mainly around networks as many of the limitations are applied at this level if using the older type (Affinity Group).


Azure IaaS Versions

First a quick note on the versions of the Azure IaaS platform.  There are only really v1 and v2 IaaS deployment options.  v1 is called Classic or Service Manager and v2 is Azure Resource Manager or ARM.  So resources can either be Classic or ARM based.   However with networks in v1 there are Affinity Group Based Networks (not good) and Regional Networks (much better).  In V2 we nowhave ARM based Networks.  Many real world limitations for most people are caused by the use of Affinity Group Type virtual networks.


Azure Affinity Group Networks

Since IaaS properly launched in April 2013 Affinity Groups were all the rage and we were asked to make sure our resources were tied to “Affinity Groups”.  This ensured that the resources are located in the same parts of the data centre essentially, and connected via fast links.   So this was for local performance and we were required to create an “Affinity Group” and assign our resources (such as networks, VMs and Storage accounts) to them.

How do I know if my network is an Affinity Group Network ?

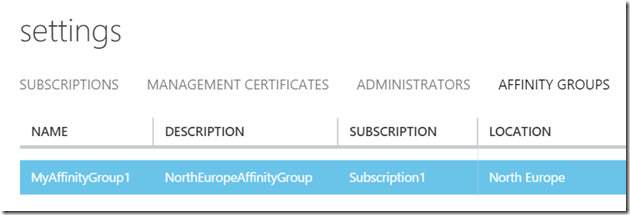
First check in the Azure Portal under Settings, Affinity Groups you should see one or more Affinity Groups here.

image

Then check the Network settings.

image


Azure Regional Networks

In around mid 2014 Microsoft announced Regional virtual networks.  These are the same Vnets but they are not tied to affinity groups as this is no longer required as the platform can now offer better performance throughout the datacentres.  You can no longer create affinity group networks.  Good !

Regional networks also offer MANY improvements over Affinity Group Networks which are highlighted here.

  • Static IP Addresses
  • Static (Reserved) Public IP Addresses
  • Internal Load Balancing
  • Instance Level IP Addresses (Assign a non-static public IP address directly to a VM)
  • Support for larger VM sizes such as A8 and A9

How Do I Know if I Have a Regional Network ?

In the old Azure Portal you will see an Azure region in there as opposed to an Affinity Group name.

image

How can I update my Affinity Group Network to a Regional Network ?

The way to do this is to ideally script out the original network and build a new regional network as there is no direct “upgrade” method unfortunately.   An example is shown here :-

  • Extract the VNET configuraton from Azure.
  • Shutdown VMs and backup VHD files or perform consistent VM backups.
  • Delete VM objects but specify you want to keep the disks !
  • Build the new network.
  • Recreate the VMs using the same VHD files / disks.

The Latest Generation Azure Resource Manager (ARM) Based Networks

The latest v2 of Azure IaaS provides us with ARM based networks these are different from classic networks as they run on the latest Azure platform.  The latest IaaS platform allows us to use things like Role Based Access Control (RBAC) whereas previously if anyone wanted to work in the Azure environment (Subscription) they would need to be coadmins.  This meant they can do pretty much anything in the subscription, which is not ideal.   And so organisations had to create multiple subscriptions just to manage security boundaries.  Now RBAC is granted generally to containers of resources called Resource Groups.  All objects in the latest version of Azure IaaS must be part of one and only one Resource Group.  If anyone is considering setting up a new Azure IaaS environment then ARM should be the place to start and not use the classic / legacy platform as this will be phased out in time.

Some limitations and notes about using ARM based networks in Azure.

  • ARM Networks can only be created in the new portal and PowerShell.
  • ARM Resources can not see Classic Resources. e.g. a Classic (v1) VM can not join an ARM network and a V2 VM can not see a classic VNET.
  • There is a very limited GUI in the new Portal at the moment.
  • Creating a gateway or VPN must be done in PowerShell.
  • To see the status of Gateways and VPNs one must also use PowerShell.
  • There is currently no option to assign a static internet IP Address to a VM.
  • A static internet IP Address can be assigned to a load balancer for inbound internet traffic.
  • The old world had a reserved IP address assigned to a cloud service.
  • Cloud Services are only available in classic deployments.
  • VMs must be assigned a NIC and do not have one by default.
  • An availability set must be specified during VM creation as it is not possible to assign a VM to an availability set after creation !
  • You can not move VMs, Networks or Storage accounts from one resource group to another.  You can move classic VMs and Storage accounts using PowerShell but not ARM objects yet.

I expect these issues and limitations will be resolved in the near future hopefully and I will mark them as so once they have been and when I notice them.

However if the list above does not pose an issue for your short and medium term requirements then I would suggest you opt for an ARM based deployment of your network, storage and virtual machines in Azure.


How Do I Know If My Azure IaaS Environment Needs Updating ?

  • If you are using classic resources in Azure then you may want to consider an update to take advantage of Role Based Access and better platform performance.
  • If you are using Classic deployment/s with an Affinity Group Network then it would be a good time to upgrade to take advantage of the above ARM benefits as well as internal load balancing, static internal and internet IP Addressing, larger VM sizes and more.


Do You Have An Affinity Group Network ?

It would be great to share your scenario here and let us know what issues (if any) you are facing with your older deployments. Any that I have not mentioned ?  Perhaps it is working perfectly fine for your needs which would also be good to know.

Thank you as always for visiting !
Running Microsoft SQL Server in Azure Virtual Machines – Options and Decision Points

How do you choose the best deployment options for your SQL Server environment running in Azure Virtual Machines?   Here are some tips which should hopefully help those that have chosen this well trodden route.

This has been written to help with key decision points for implementation when considering using VMs running in Azure to host SQL Server.

Why Run SQL Server In Azure Virtual Machines At All?

There are many reasons you may want to run SQL Server using VMs in Azure. A handful of reasons many organisations are choosing this approach are provided here :-

  • You need some compute capacity which is not available on premises or is not available in a timely manner.
  • You need full control of the SQL Server instance or require custom add-on tools or applications running on the server.
  • You need to spin up a SQL Server instance for test / development purposes in a short timescale.
  • You need to spin up a production environment in a short timescale!
  • You want to pay as you use, and for what you use rather than invest up front in hardware and its implementation.
  • SQL Azure (PaaS) may not provide the control or features you require such as Windows Authentication for example.
  • You may want to use Azure as a disaster recovery location for your on premises SQL Servers.
  • Depending on your current environment you may want a more reliable, secure and scalable platform to host your infrastructure.

SQL Server Azure Virtual Machine Deployment Options

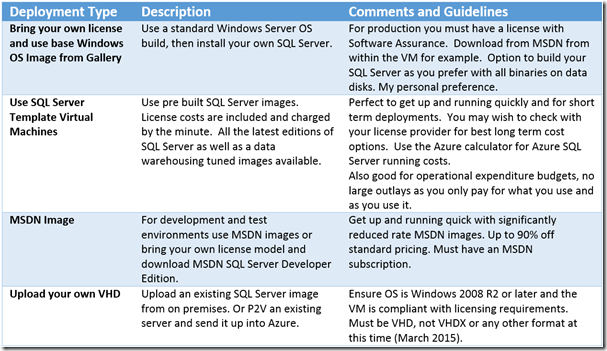
Here are some options available for running SQL Server in virtual machines in Azure IaaS.

image


Azure Virtual Machine SQL Server Gallery Options

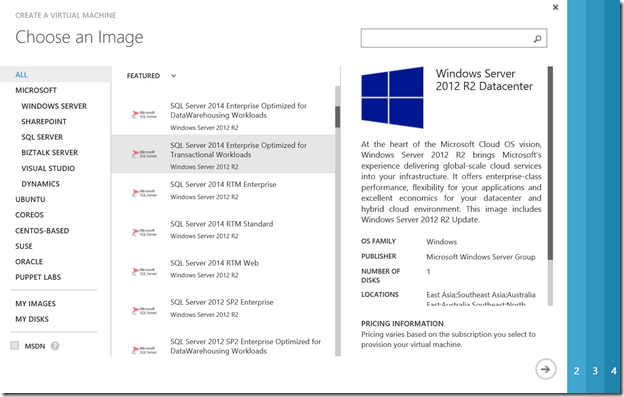
We can see below some of the SQL Server template options provided in the gallery as well as the MSDN option on the bottom left.

image


Choosing the Right Deployment Option

The first thing to do is review the SQL Server Edition requirements and related costs followed by purpose and timescales.

SQL Server Edition and Licensing

A feature comparison of the different Editions of SQL Server can be found here  :-

SQL Server 2014 https://msdn.microsoft.com/en-us/library/cc645993.aspx
SQL Server 2012 https://msdn.microsoft.com/en-us/library/cc645993(v=sql.110).aspx

For example if you need the advanced BI features, OR AlwaysOn high availability , OR SSRS scale out farm capability you will need Enterprise Edition. Also note that SQL Server Standard Edition (2014) is limited to 128GB of RAM so if you need more than this look at Enterprise.   These are just some feature examples.

Look at the number of users that will need a license and calculate the costs of CALS if using Standard or BI Edition.

Duration of Usage for the SQL Server VM/s

Long Term Production Use

If the environment is to be for production and long term, review the costs of bringing your own license with your license reseller, compared to using the pre-built templates using the Azure Calculator which can be found here :- http://azure.microsoft.com/en-us/pricing/calculator/?scenario=full

Short Term Use

If the environment is to be used for the short term OR if there is a preference for pay as you go then you may choose to use the template virtual machines which include the SQL Server licenses and are quick to provision. You may also choose this option if you do not want your team or yourself to install SQL Server as well as prefer to have Azure provide the SQL licensing so all costs are bundled into one billing provider.

Configuration Options

Ok so by now hopefully you know which license model, SQL Edition and gallery image (or VHD upload) you require. You now need to ensure you have the correct configuration for the VM and its supporting infrastructure such as storage and networking.   I’ll provide high level details here only.

Network

This includes things like what type of network, network IP addressing, subnets, IP address assignments, DNS, security options, load balancing, geographic location etc.  You will also need to consider VPN types and options if required. Full Azure network documentation is provided here for reference – http://azure.microsoft.com/en-gb/documentation/services/virtual-network/

image

Storage

Where will the storage be located geographically ? Storage container names, local or geo-replicated, container structure.  Microsoft recommend local storage rather than geo- replicated storage for SQL Server for best performance.

image

High Availability

Does your VM need to be highly available? If so then you will need two in an availability set.  You will also need to architect database high availability using either Mirroring or AlwaysOn Availability Groups.   Failover Clustering for SQL Server is also not yet supported.

An example of an availability set is shown below where essentially the SQL Server VMs run on different racks (fault domains) and different update domains.  This ensures Microsoft provide a 99.95% uptime SLA on machines in the availability set.

VM Sizing

If you need a high performance virtual machine then use the D Series (or even G Series) virtual machines in order to make use of the higher spec processors and SSD storage, as well as larger VM CPU and RAM options.

Tip: When creating your SQL Server use a D Series VM size to start with and then drop back to an A series after creation if you need to.

This allows you to easily switch between all D and A Series VMs without having to recreate the VM.  By recreate, I mean removing the virtual machine and recreating it using existing disks. I don’t mean rebuilding the entire server/s.

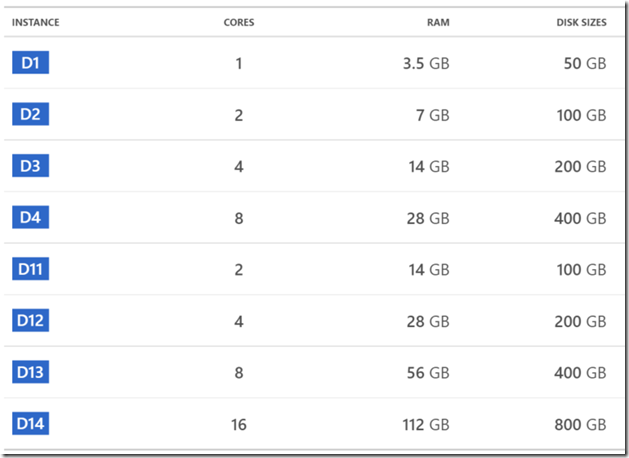
Here is a table of the D Series VMs as an example. You can see the amount of (temporary!) SSD available with each size in the last column “Disk Sizes”.  Taken from – http://azure.microsoft.com/en-gb/pricing/details/virtual-machines/

image


Follow the performance guidelines here which I will also cover in the near future with scripts and screenshots of the elements mentioned within it :-  https://msdn.microsoft.com/en-us/library/azure/dn133149.aspx


Standard Versus Basic VMs

Azure Virtual Machines can be either Standard or Basic and the configuration can be changed at any time through the GUI or PowerShell (although the machine will shutdown and restart if changed).

Basic VMs are about 20% lower in cost but do not have the option to autoscale or load balance and also have  limited lower spec VM sizes compared to standard.  The other main difference is that the basic machine OS disks are limited to 300 IOPS whereas standard VMs are 500 IOPS.  Basic VMs are perfect for small servers that do not require these features or disk performance.

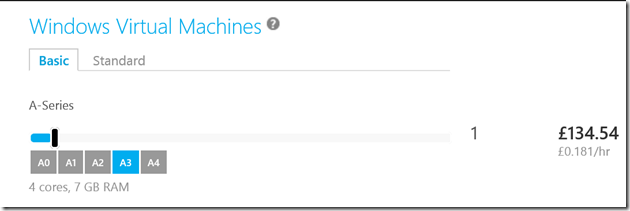
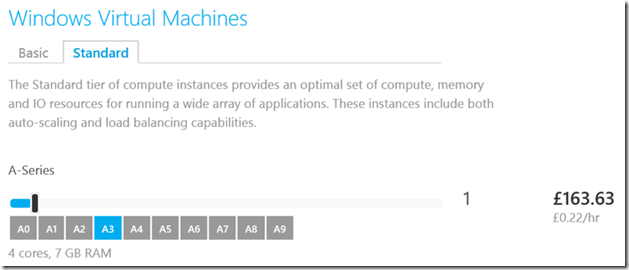
  • Here is the cost of an A3 Standard VM per month using PAYG prices as of 4th March 2015.   The screen shots also show the available VM sizes in with each option (Standard or Basic).

image

  • Here is a Basic VM cost for the same size server.

image


Conclusion

As you can see there are many factors and decision points to consider even after you have decided to use Azure Virtual Machines for SQL Server.  I hope this post helps provide a structured method and some useful information for those about to carry out an implementation of SQL Server in Azure.  Put a comment below on your deployment options and reasoning as it would be interesting to see other peoples decisions.  Also if you feel I have missed anything that I can add to help others do let me know and I can update, and give full credit of course !


image

The next post will look at performance guidelines for SQL Server running in Azure Virtual Machines to make sure your SQL Servers are optimally configured. Until then.  Farewell !

Azure Infrastructure Exam 70-533 Implementing Microsoft Azure Infrastructure Solutions – Study Notes and Tips

Hi yesterday (Jan 20th 2015) I passed the Microsoft exam – 70-533 Implementing Microsoft Azure Infrastructure Solutions and so this gives one a “Microsoft Specialist” certification.

I have been doing some very interesting projects with Azure infrastructure over the last year or so and so I thought I would take this exam just to have it under my belt.

I have written this to hopefully point others in the direction of some useful study material.   There are only a few links here which I used along with real world experience which is a must. There are many other blogs on the internet with lots of other links so here are the main ones I found useful.

microsoft-azure-logo

My transcript was updated the same day too !

image

Main Training Requirements

You must ensure obviously that you have actually done a lot of the requirements mentioned in the “skills measured“ list on the Microsoft site.  Get an Azure subscription, even a free trial and try out building VMs and websites and SQL Databases.  You need to know all the different hosting plans for websites as well as the different SQL Database Tiers.

Also make sure you look into how to monitor VMs and websites which includes setting up alerts and logging for websites.  Which tabs do you go to ? What are the settings you need to adjust ?

Take a look at Service bus, add a queue and see what options you have available.  Read up on the basics of this too.

Be familiar with Azure VNETs, Site to Site VPNs as well as VNET to VNET.  Ask yourself what are the requirements for various connectivity scenarios and what process should I follow for each.

My Favourite Azure Infrastructure 70-533 Exam Links

Go through the Azure training here. This was a four day course which ran in December 2014 and is split into various topics with lots of great information and demos.  http://channel9.msdn.com/Events/Microsoft-Azure/Level-Up-Azure-IaaS-for-IT-Pros

Virtual Academy is also the best source of Microsoft training on many subject areas.  This course goes into IaaS http://www.microsoftvirtualacademy.com/training-courses/windows-azure-iaas-deep-dive-jump-start

There are several newer and more up to date courses available on the virtual academy too.  Well worth checking out !

Microsoft Exam Details

https://www.microsoft.com/learning/en-gb/exam-70-533.aspx

Other Excellent Blogs With Very Useful Links

https://curah.microsoft.com/303527/exam-ref-70533-implementing-microsoft-azure-infrastructure-solutions

http://www.azureman.com/certification/azure-infrastructure-exam-70-533-study-guide/

http://www.techbunny.com/2015/01/early-experts-exam-study-guide-for-70.html

Good Luck

The best of luck in your studies and I hope the exam goes well for you.

Thanks for reading !

Makecert – Azure Management Certificates

I have created this article as a reference for myself when I need to create an Azure management certificate for various tasks such as setting up Azure automation for example.  I hope you find this useful too.

Tip:- if you regularly work with Azure then I would advise you install the SDK as soon as you can when you are on a good internet connection as it is ~300Mb. It’s worth having as part of your standard computer build.


Create and Upload an Azure Management Certificate

You will need a tool called Makecert and this is available as part of the Windows SDK available here.

You will need the Windows SDK so download the installer (less than 1Mb), run it and just select the top option.

image_thumb[19]

Once installed  create the certificate via the command line.

I have used the script found on this blog which is every useful.

http://blogs.technet.com/b/cbernier/archive/2014/01/17/create-a-self-signed-certificate-for-use-with-windows-azure-using-a-windows-script.aspx

@echo off
echo This script will create an Azure certificate and export for use in Windows Azure.
echo.
echo Computer Name
echo %computername%
echo.
echo creating folder: %SystemDrive%\certs
mkdir %SystemDrive%\certs
%SystemDrive%
cd certs
echo.
dir “C:\Program Files (x86)\Windows Kits\8.1\bin\x64” | findstr /i “makecert.exe”
IF ERRORLEVEL = 1 GOTO ERROR
IF ERRORLEVEL = 0 GOTO CreateCert
echo.
:CreateCert
echo creating cert and placing it in %SystemDrive%\certs
echo.
“C:\Program Files (x86)\Windows Kits\8.1\bin\x64\makecert.exe” -r -pe -n CN=%computername%-AzureCert -ss my -sr localmachine -eku 1.3.6.1.5.5.7.3.2 -len 2048 -e 01/01/2016 automation-AzureCert.cer
echo.
echo.
goto end
:ERROR
echo makecert.exe file not found. Please check directory path above or download and install the Windows 8.1 SDK from http://www.microsoft.com/click/services/Redirect2.ashx?CR_EAC=300135395
goto end
:end

Create a .bat file with the above script or feel free to alter the dates etc.  Run it and the certificate is created.

image_thumb[23]

The certificate is created in the C:\certs folder and imported into the machines personal certificate store.

To export a PFX file for possible later use export the certificate from MMC, Details tab of the certificate, Copy to File.

image_thumb[30]

Click next on the first box,then select export private key.

image_thumb[32]

Leave defaults and press next.

image_thumb[34]

specify a password

image_thumb[36]

Enter the location to save the file and exit.

You can now upload this certificate in the Azure portal, under settings, management certificates, upload.

Upload The Azure Management Certificate

Return to the Azure Portal and upload the management certificate.

image_thumb[25]


I hope you found this useful.

Thanks for reading.

Using Azure Files (Preview)

The Azure File service enables the use of highly available and scalable Azure blob storage to be used as file shares for multiple virtual machines or PaaS roles.   Essentially one can create a cloud based file share on resilient storage subsystems and then access those file shares using the standard SMB 2.1 protocol.  The file shares appear as mapped drives on the virtual machines they are assigned to.


Why use Azure Files ?

Azure files is a great way to share persistent data between multiple servers or PaaS roles (such as websites) without having to set up file servers.  This can be to store configuration files, log files or any other data and make it independent to a virtual machine instance.  The storage is provided by highly resilient storage and so there is no need to worry about placement and accessibility of individual VHD files.


How much does it cost ?

Currently during the preview the costs are discounted at 50% and are £0.0255 per GB for locally redundant file shares or £0.0319 per GB for geo redundant file shares. Locally redundant means that the data is stored in triplicate in the same data centre and geo redundancy adds replication to another data centre.  This can be set during creation of the storage account and can also be changed if required after creation.  Full pricing for storage can be found here http://azure.microsoft.com/en-us/pricing/details/storage/.


Current Limitations and Requirements of Using Azure Files

  • Currently Azure files is in preview mode and so there will be no SLAs provided until it goes to General Availability.
    • This means you must also request access to the service which is available on the Azure preview page
  • Once activated (can take minutes) you must set up a new storage account which can be regional or assigned to an affinity group.
  • You can only create the file shares using PowerShell.
  • Read-Access Geographically Redundant Storage (RA-GRS) storage accounts are not supported, only local and geo redundant options are available at this time.
  • The file shares are only available to virtual machines or PaaS websites within the same datacentre as the file share storage account.
  • Access to the file shares is provided via Azure Storage Keys.  Currently there are is no AD integration.


Steps Required To Get Up And Running

  1. Activate Azure Files Preview from the preview page  (link above).
  2. Create new storage account and retrieve access key.
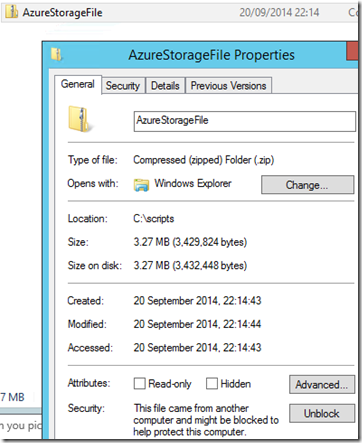
  3. Download the Azure file storage cmdlets, unblock, extract and import into your PowerShell session.
  4. Install Azure PowerShell Modules and connect to you Azure subscription.
    • Previous article on how to connect to Azure using PowerShell is here
  5. From PowerShell, setup the account credentials and create the file share.
  6. From another Azure VM attach the file share as a mapped drive.


1. Activate Azure Files Preview

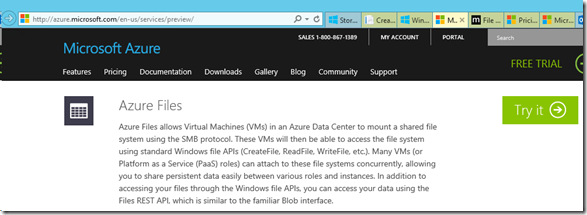
  • From the Azure preview page locate the Azure Files feature and click “Try it”.  Microsoft will send an email shortly after (could be minutes).

image


2. Create Storage Account

  • Create a new storage account

image

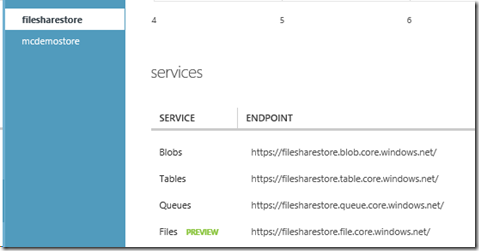
  • Once created, open the storage account dashboard and you will see the Files preview service listed as shown here :-

image

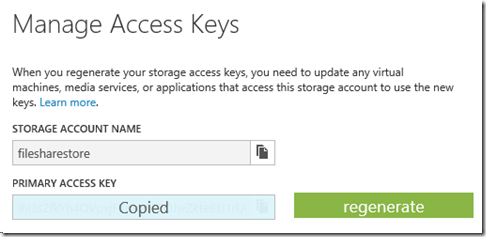
  • Click on Manage Access Keys, copy one of the keys and keep it safe for the scripting section later in section 5 below.

image

3. Download The Azure Storage File PowerShell Modules

image


4. Connect To Your Azure Subscription In PowerShell and Import the Storage Module

If you have not setup PowerShell to connect to Azure yet please see here.


#Get-AzurePublishSettingsFile
#Import-AzurePublishSettingsFile ‘C:\Myfile.publishsettings’

#Set Subscription Name
$subscriptionname = ‘My Demos’

Set-AzureSubscription $subscriptionname -CurrentStorageAccountName ‘mcdemostore’
Select-AzureSubscription $subscriptionname

#Import downloaded storage module
import-module ‘C:\scripts\AzureStorageFile\AzureStorageFile.psd1’

5. Create a Context for Account and Key

  • From the same PowerShell session enter the storage context which is essentially the account name and password (storage key).

The format for this is $ctx=New=AzureStorageContext <account name> <account key>

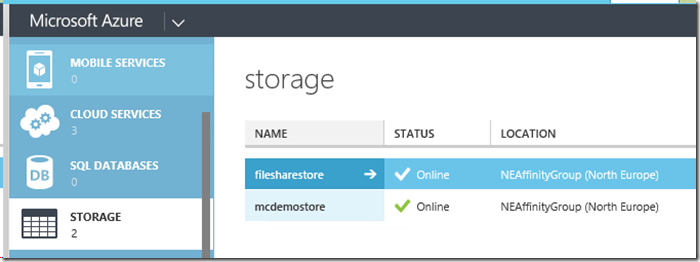
The account name we have set up in this example is filesharestore which can be seen here to show you the context.

image

#Create a context for account and key

$ctx=New-AzureStorageContext filesharestoreStorage key

  • Create a New Share

This code will actually create a file share in Azure using the account and storage key used above.  We need to supply a share name.

# create a new share
$s = New-AzureStorageShare sqlbackupshare -Context $ctx


6. Attach The Share to Azure Virtual Machines

Log into an Azure virtual machine located in the same region as the storage account used above.  We will create a persistent share so it remains after a reboot.  To do this we need to store the credentials and map the drive using the stored credentials.

  • Open up an administrative PowerShell window and enter the following code and substitute your own account name and storage key.
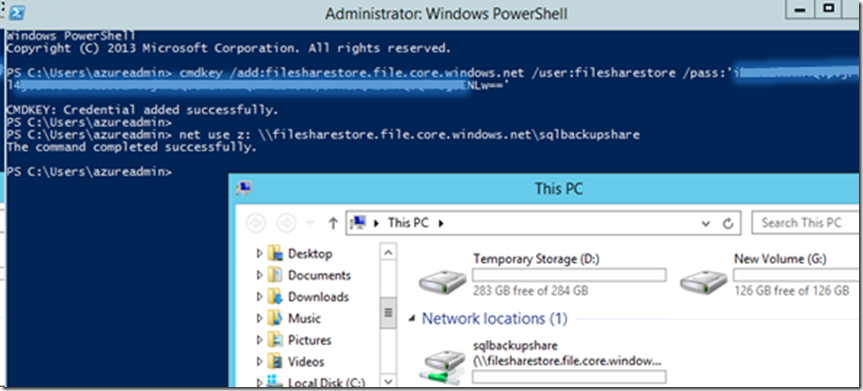
cmdkey /add:filesharestore.file.core.windows.net /user:filesharestore /pass:’Yourkey
net use z: \\filesharestore.file.core.windows.net\sqlbackupshare

Voila!

image


Troubleshooting Azure Files

  • Trying to mount an Azure file share using net use fails with code 64.

net : System error 64 has occurred.

The specified network name is no longer available.

This occurs as the file share is only mountable from another Azure resource (virtual machine or website) in the same region as the storage account.

  • Importing the AzureStorageFile.psd1 gives errors

    import-module : The following error occurred while loading the extended type data file:
    , C:\scripts\AzureStorageFile\AzureStorageFile\Microsoft.WindowsAzure.Commands.Storage.File.types.ps1xml(5) : Error in type

This looks like a bug as the process continues to work regardless of these errors.  If anyone knows any more please feel free to post here.


Thank you for taking the time to read this article about Azure Files !

I hope this was useful for some of you.   Do let me know if it was as that’s the reason I make these tutorials 🙂

If there are things you can add or have some good ideas about the use of Azure files also let me know so we can all share some good ideas.  This maybe where Microsoft are heading towards better support for clustering in the future but we shall wait and see !  Thanks again.


Mitesh